As my first tutorial for Generative Hut, I've decided to show you how you can use the brilliant free 'hot4d' plugin by Valkarii to generate a section of procedural (and highly customisable) ocean. We will then use this slice of ocean as our guide to manipulate 10,000 particles resulting in a mesmerising low-fi foam effect.

Installation
So to get started download and install the latest version of hot4d from Valkaari.
At the time of writing this plugin is available for Mac/Windows for Cinema 4D versions R14 - R21.
Once downloaded, unzip the folder and move it to your C4D plugins folder. This can be easily found by opening C4D preferences and clicking the 'Open Preferences Folder' in the bottom left.

Navigate to the plugins folder within your C4D folder and place your hot4D folder within. Your folder structure should look like this.

Restart C4D and the installation is complete.
Making Waves
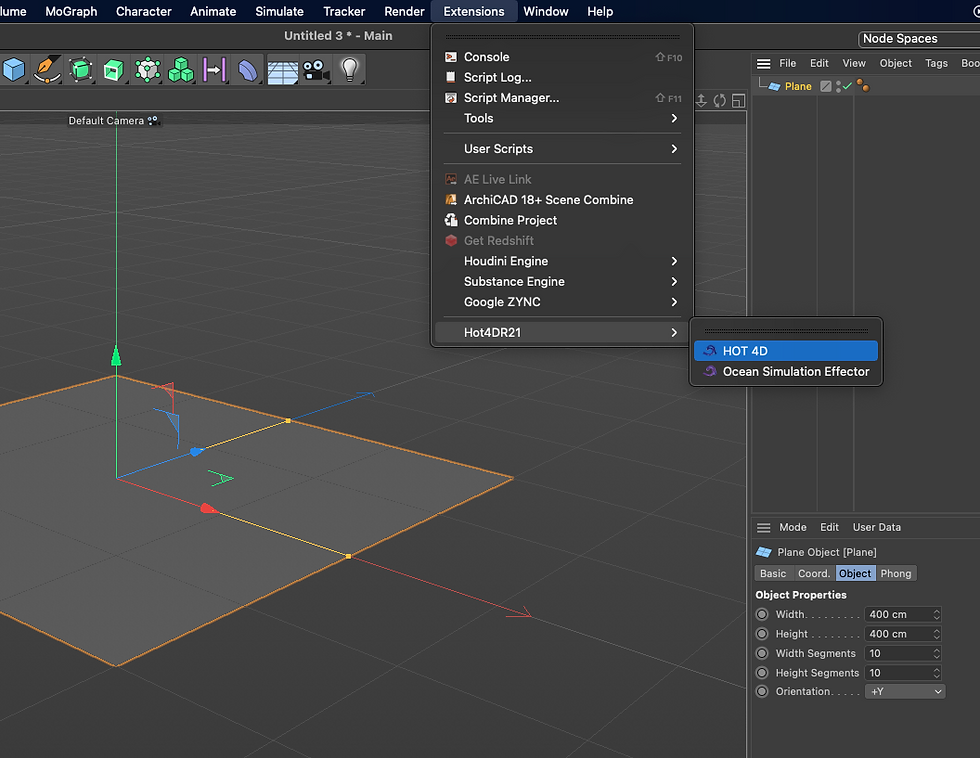
Now the plugin is installed open up a fresh C4D scene and add in whatever primitive you want to get wavey. For this example, we'll simply be using a plane. With the plane in the scene navigate to Extensions > hot4DR21 > HOT 4D to add the effector to your scene.

Next, place the HOT 4D effector as a child of the primitive you want to effect by dragging its layer title onto the top of the parent, just as you would with any other C4D effector such and Bend or Twist. You will instantly see the plane deform and begin to look a lot more interesting. Better yet you will already be able to see the waves in motion if you simply play your scene as is.

Fine Tuning Your Ocean
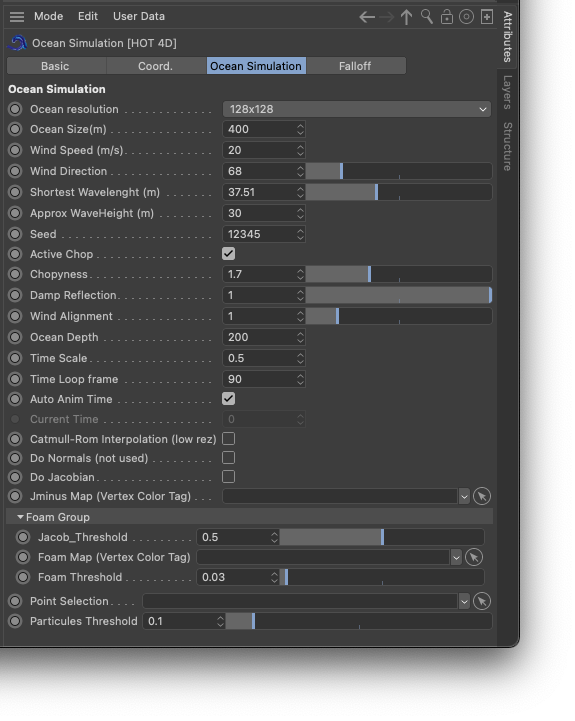
From here you can mess around with the many factors of the plugin by tweaking settings in the Ocean Simulation tab of the effector. I suggest if you intend to make a motion graphic rather than a still leave the scene playing while you change settings as this will give you a better sense of what each setting does for the movement of your scene.

It's important to note that in C4D all effectors, HOT 4D included, will only be represented by the number of polygons your original primitive has. By default, a plane in C4D has 10 x 10 segments leaving the shape with 100 polygons. This means if you're going for a sharp PlayStation 2 style look you may want to reduce the segments in your plane to lower values. Whereas if you are going for a more organic curvy look, increase them to higher values. The main drawback of higher values is they take more computer power to process meaning slower previews and longer render times.

As a final note, this plugin is capable of generating photo realistic oceans and has all sorts of settings for foam and other things we won't be covering here so don't worry if some of the settings don't seem to change much on our relatively basic use-case.
From Plane To Particles
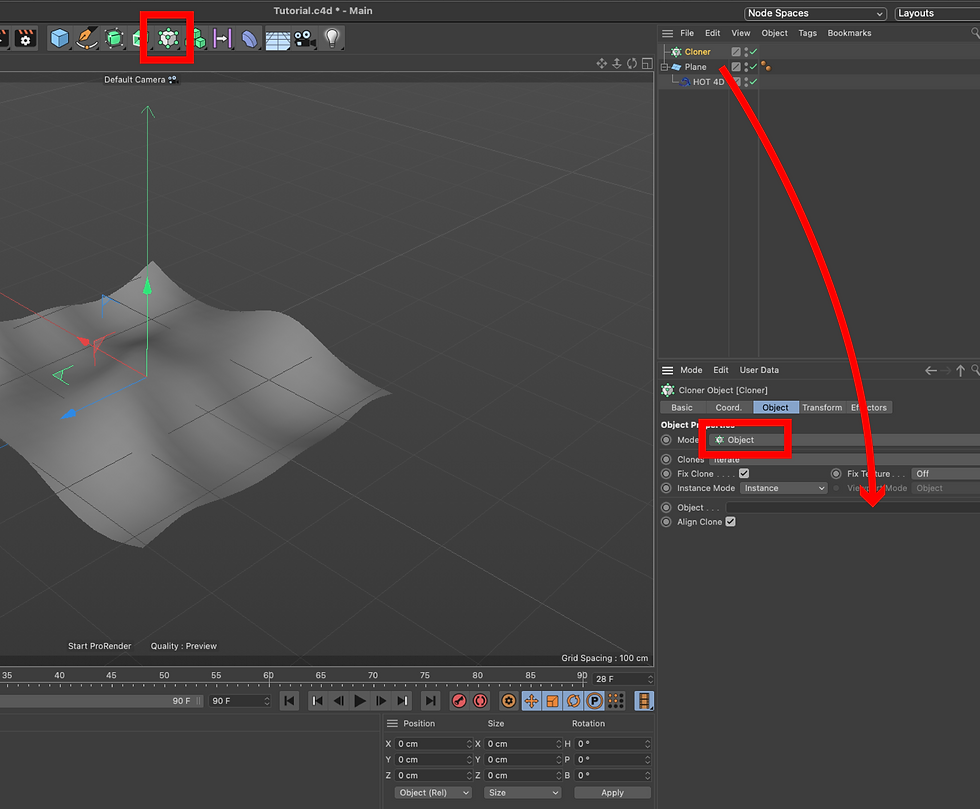
From here you could throw on a texture and call it a day, however, to really define every movement of our wave we are going to use a cloner to spread thousands of tiny particles across the face of our waves. To begin let's add a Cloner to our scene and set its mode to Object. Once added simply drag the plane layer from to the Object section within the cloner.

Your cloner is now set to clone objects across the face of your wave. Next, we need to add and the object we want to clone. In this example, we'll use a disk with a size of 2cm and the minimum segment counts of 1 and 3. Your shape could be anything at all if you want a particular particle style but as we're going to be cloning ours 10,000 times its good to keep it simple. If you only wanted a couple of hundred clones you could be able to get away with cloning much more complex 3D shapes such as spheres.

To specify this object as the one we want to clone we simply position it as a child of the cloner. with this done you will see the shape is now being cloned across the face of your wave. The default clone count is 20 but we can gradually bring this up as high as we dare. My laptop started whirring pretty loud at 10,000 so I decided to call it quits there. Depending on your computer and the complexity of your shapes you could go much higher though. You can also fine-tune the size of your particle without removing it from the cloner to get the perfect density of particles on your wave. I opted to shrink my particles down to 0.5cm.

Now the particles are conforming to the shape of your wave there is no need to show the plane itself. While we still need it in the scene we can hide it from both our editor and render by toggling the grey dots next to the layer name until they show as red. This will render the plane invisible while still keeping it in the scene to drive the cloner.

As a finishing touch lets quickly make two textures with only the luminance option active. I've chosen white for my particles and dark blue for my background. Using only luminance ensures the particles will not cast shadows onto one another resulting in a. very sharp flat finish.

With the white texture applied to our disk and out blue texture applied to a simple Sky object our waves are looking great in the preview render. Especially when viewed from a slightly lower angle where the overlapping particles start to give a foaming effect on the tip of the waves.

All that's left to add a camera into the scene and set your render settings. Make sure you are using the standard renderer and have your frame range set to 'All Frames'. I went for 1080 x 1080 at 30 fps for my dimensions but these can be anything you like.

That's it! Render away and enjoy your ocean of particles!


Kaiser OTC benefits provide members with discounts on over-the-counter medications, vitamins, and health essentials, promoting better health management and cost-effective wellness solutions.
Obituaries near me help you find recent death notices, providing information about funeral services, memorials, and tributes for loved ones in your area.
is traveluro legit? Many users have had mixed experiences with the platform, so it's important to read reviews and verify deals before booking.
For many, the idea of living in a log cabin is a dream come true. It represents a return to simpler times, where log cabin california the focus is on the essentials of life—comfort, family, and nature. The peaceful solitude of a log cabin can be a refuge from the noise of modern society.
CBD can be a game-changer for those dealing with social anxiety. It helps individuals feel more at ease in social road trip desert stardust situations by calming racing thoughts and promoting a sense of confidence. This makes CBD an excellent choice for fostering relaxation in stressful social environments.
The Canadian Registration Number (CRN) is a unique identifier assigned to pressure equipment and fittings in crn quebec Canada. It ensures compliance with safety regulations and standards set by provincial and territorial authorities. The CRN is essential for manufacturers, engineers, and inspectors to verify that equipment meets the necessary safety requirements.
Great tutorial, Finn! The hot4d plugin is such a powerful tool for creating realistic ocean simulations in Cinema 4D, and your step-by-step guide makes it super accessible. Excited to try out the foam effect with particles and see what creative possibilities it opens up. For anyone looking to get started, the download link is right here – definitely worth checking out!